Snip Like a Pro: Top 6 Tips for Clean and Precise Audio Clipping Online
Crystal-clear sound isn’t a nicety anymore—it’s a necessity. Whether recording a podcast, narrating a product demonstration, or cutting up audio for a video commercial, sound counts every second. But here’s the problem: raw sound is hardly ever flawless. From embarrassed pauses to hums in the background, there’s always that bit to cut out. That’s where Pippit’s audio clipper comes in.
Consider audio clipping to be the digital equivalent of editing film: trimming fat, streamlining flow, and establishing seamless transitions that keep your audience hooked. With the proper strategy—and a savvy tool such as an audio clipper—you can take rough recordings and turn them into pro-grade material that sounds as good as it appears.
Trending Now!!:
Whether you’re a YouTuber, entrepreneur, or are handling audio on TikTok and YouTube Shorts, this post provides a primer on how to clip like an expert. Join us in diving into the most useful and robust tips for making your audio bite-sized, yet engaging.

When seconds really matter: why audio clipping has never been so important
This is the era where distractions have become short-lived and attention spans mercilessly short; all the mess an audio could convey signs to killing viewer engagement with a single instant, no matter how immaculate the visuals are.
- First impression: Most importantly, first impressions are sonic: People subconsciously determine quality within 3 seconds. Clear audio creates credence in your brand.
- Short-form content thrives on clarity: With their fast pace, TikTok, Instagram Reels, and YouTube Shorts rely on precision clipping to give your content a hard and fast hit.
- SEO and algorithms adore retention: On platforms where view time determines reach, each clipped second increases your odds of being seen.
- Podcasts and webinars require polish: Long-form audio requires concise edits to preserve listener attention and keep your narrative flowing.
In brief? Audio clipping is not just about sound—it’s about retaining your audience, gaining attention, and crafting immersive experiences.
Tip 1: Clarify your audio’s purpose prior to trimming
You can’t clip clever if you don’t know what you’re working toward. Each audio snippet must have a purpose.
- Establish your tone: Is it informational, relaxed, dramatic, or motivational? This impacts how tightly you clip.
- Keep takeaways in mind: Clip around your main points or calls to action.
- Understand your format: A voiceover for a promo piece will be clipped differently than an interview for a podcast.
Every clip brings you one step closer to great content only with a purposeful attitude.
Tip 2: use a good audio clipper (not some online random tool)
Don’t risk your quality on clunky tools. Use a pro-grade audio clipper that provides control and speed.
- Search for waveform views: See each beat and silence.
- Use marker tools: Mark where to cut for quicker navigation.
- Real-time previewing: Listen as you trim to make sure no awkward jumps or cut-off sentences.
Pippit on CapCut consolidate these capabilities into a friendly, web-based environment.
Tip 3: Minimize noise prior to trimming
Humming air conditioning, sound of fans, or traffic hum can be exasperating—to clip—and completely destroy an otherwise flawless take.
- Apply “reduce noise” options prior to trimming: This ensures that distorted fade-ins or dodgy transitions won’t happen.
- Remove pops and clicks with filtering: Particularly effective for vocals and interviews.
- Record in a controlled environment: The cleaner the raw audio, the less editing work you’ll have to do later.
Getting your audio ready before you cut puts you in a better position for a smooth edit.
Tip 4: Equalize volume between clips
When one sentence thunders and the next is a whisper, your listeners will disengage—or worse, mute.
- Normalize audio: Puts all sounds on an even playing field.
- Use compressors: Subdue highs, boost lows for more even speech delivery.
- Check peaks: Don’t distort or clip by staying at safe dB levels.
Balanced audio makes your content easy to listen to, regardless of the platform or device.
Tip 5: transitions are your secret weapon
Sound like a studio editor? Transitions are all it’s about.
- Add fade-ins and fade-outs: Avoid sudden starts or endings.
- Use crossfades: Seamlessly merge two clips together, particularly in dialogue or music beds.
- Silence with intent: Veiled pauses for an effect of silence mean silence is just as potent as the possibility of words.
Amidst a few edits, these tiny things will knit your content, making it feel cohesive, intentional, and somehow like the pieces were recorded on separate occasions.
Tip 6: Preview with fresh ears
In the editing hours, your brain incorporates mistakes into an automatic style. Step back to get the view.
- Hear the next day: A fresh ear reveals everything.
- Test with multiple devices: What sounds sharp on headphones may sound dull on speakers.
- Get it checked: Have someone ignorant about the content listen for pace, clarity, and tone.
One last round of review brings you from “good enough” to really polished.
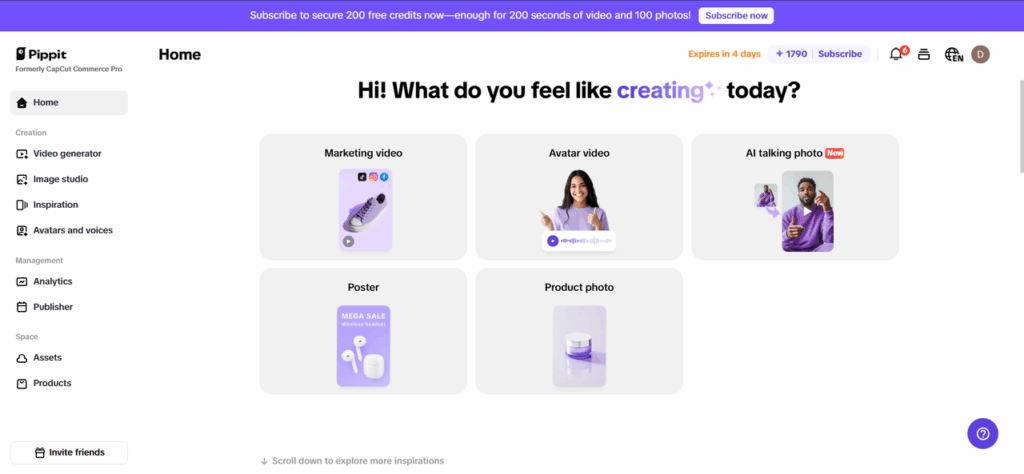
How to clip audio using Pippit (powered by CapCut)
Pippit makes audio editing easy using integrated tools that favor creators, marketers, and editors. Here’s why:
Step 1: Upload your audio file
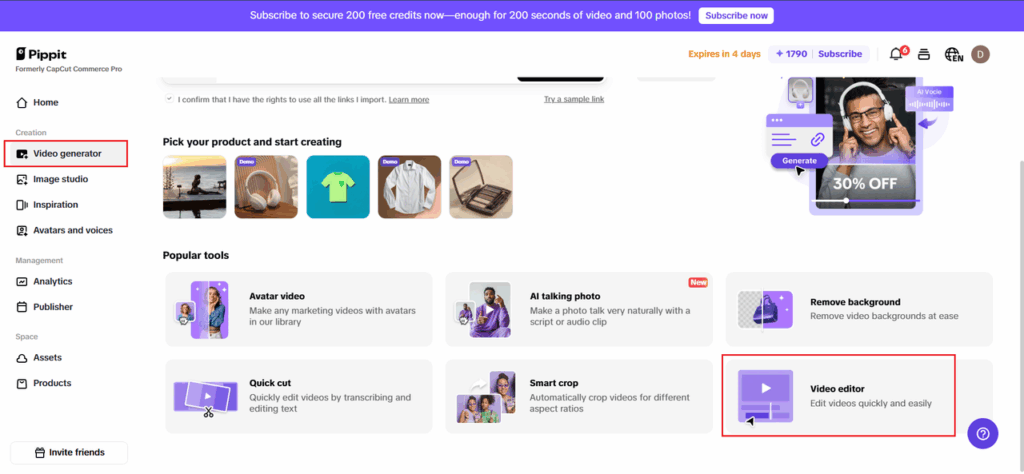
Launch Pippit’s Video Editor within the “Video generator” category. From the “Video editor” tab, drag and drop your audio or video files onto the timeline. If necessary, extract audio from video in a single click.

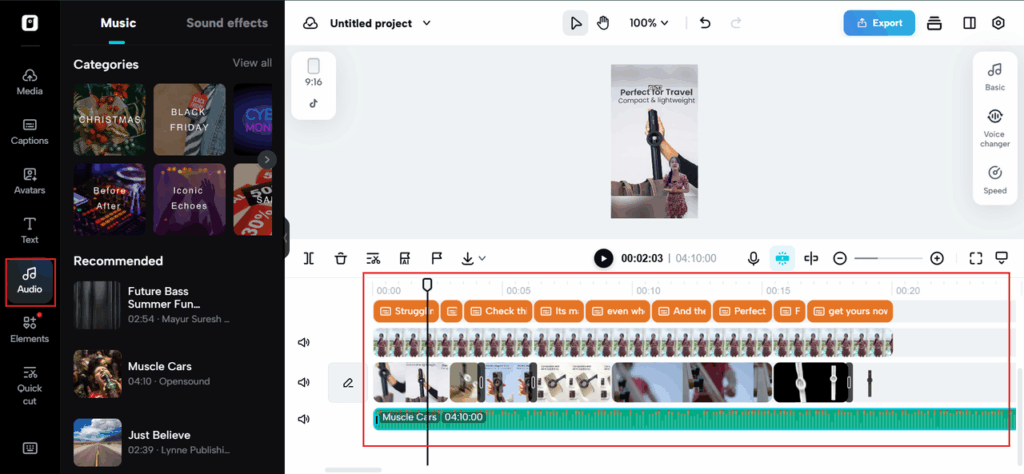
Step 2: Trim or merge tracks
Use your waveform trim handles to remove unwanted portions. You can also merge audio clips, move their positions, or superpose them for the desired effect. Insert fade-ins, fade-outs, or remove background segments with the cutter and merger tool.

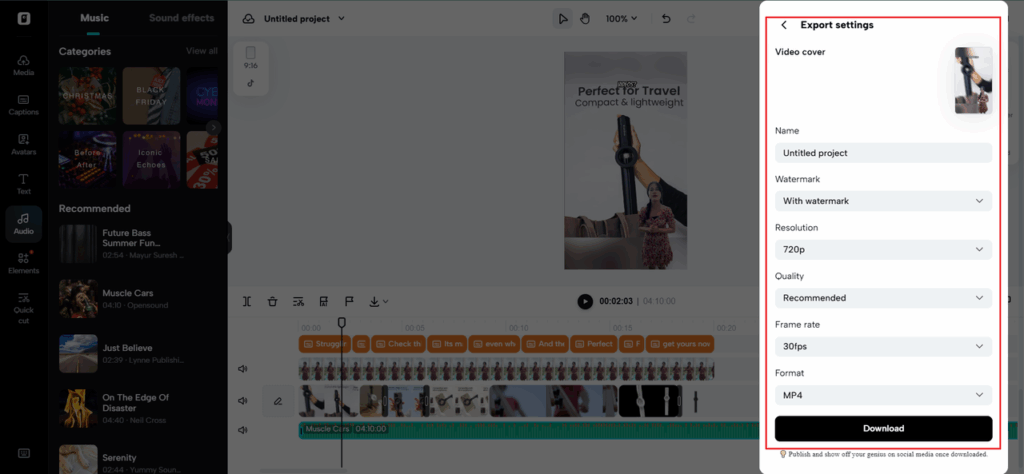
Step 3: Export your final audio
When you’re satisfied with the edit, hit “Export.” You can download it in multiple formats or export directly to platforms, depending on your project’s requirements.

Pippit streamlines audio clipping quicker, cleaner, and more creatively—ideal for today’s content pipelines.
More than clipping: Other clever audio edits to try
- Audio clipping is just the beginning: After you master it, check out these boosts to give it even more finesse.
- Add AI-created captions: Assist with accessibility and audience retention.
- Utilize background music: Light ambient music can add depth to your audio.
- Add sound effects: Ideal for transitions, narrative, or dramatization.
- Sync with visual beats: Particularly helpful in Reels, TikTok, or explainer videos.
By broadening your arsenal beyond clipping, you turn static audio into dynamic, scroll-stopping content.
Conclusion: Make every sound count with smarter clipping
Every second of audio can be a connection. Whether you are editing a podcast, refining a product demo, or preparing social media videos, any audio clean-up process enhances the clarity of your message and the strength of your content.
So, don’t just cut—be intentional about the clipping you do. With programs like Pippit, powered by CapCut and the trade tricks you learned along the way, you’re ready to snip like a pro and make audio that is virtually an extension of your being.
Are you ready to go? Upload your next audio file into Pippit and treat your content to the clean professional sound it deserves- your audience will appreciate the difference.
